Setting up a world
The flat map or whole world fork, physical scale, the three ways to start terrain, importing a heightmap, and resuming an existing world.
Every project in Dayside begins in the worlds picker and, for a new project, in the setup wizard behind New world. Setup decides two things you cannot casually change later: whether the project is a flat map or a planet, and what its ground scale is in kilometres. Everything downstream (river catchments, snow line, brush sizes, export resolution) is measured against that scale, so it is worth getting right before you build.
The worlds picker#
The picker is the front door. It lists every world Dayside knows about, with a search box (Search worlds), a cycling Sort button (Sort: Recent, Sort: Name, Sort: Size) and a count chip. Recent uses a locally stored open stamp, Size sorts by pixel area, Name is alphabetical.
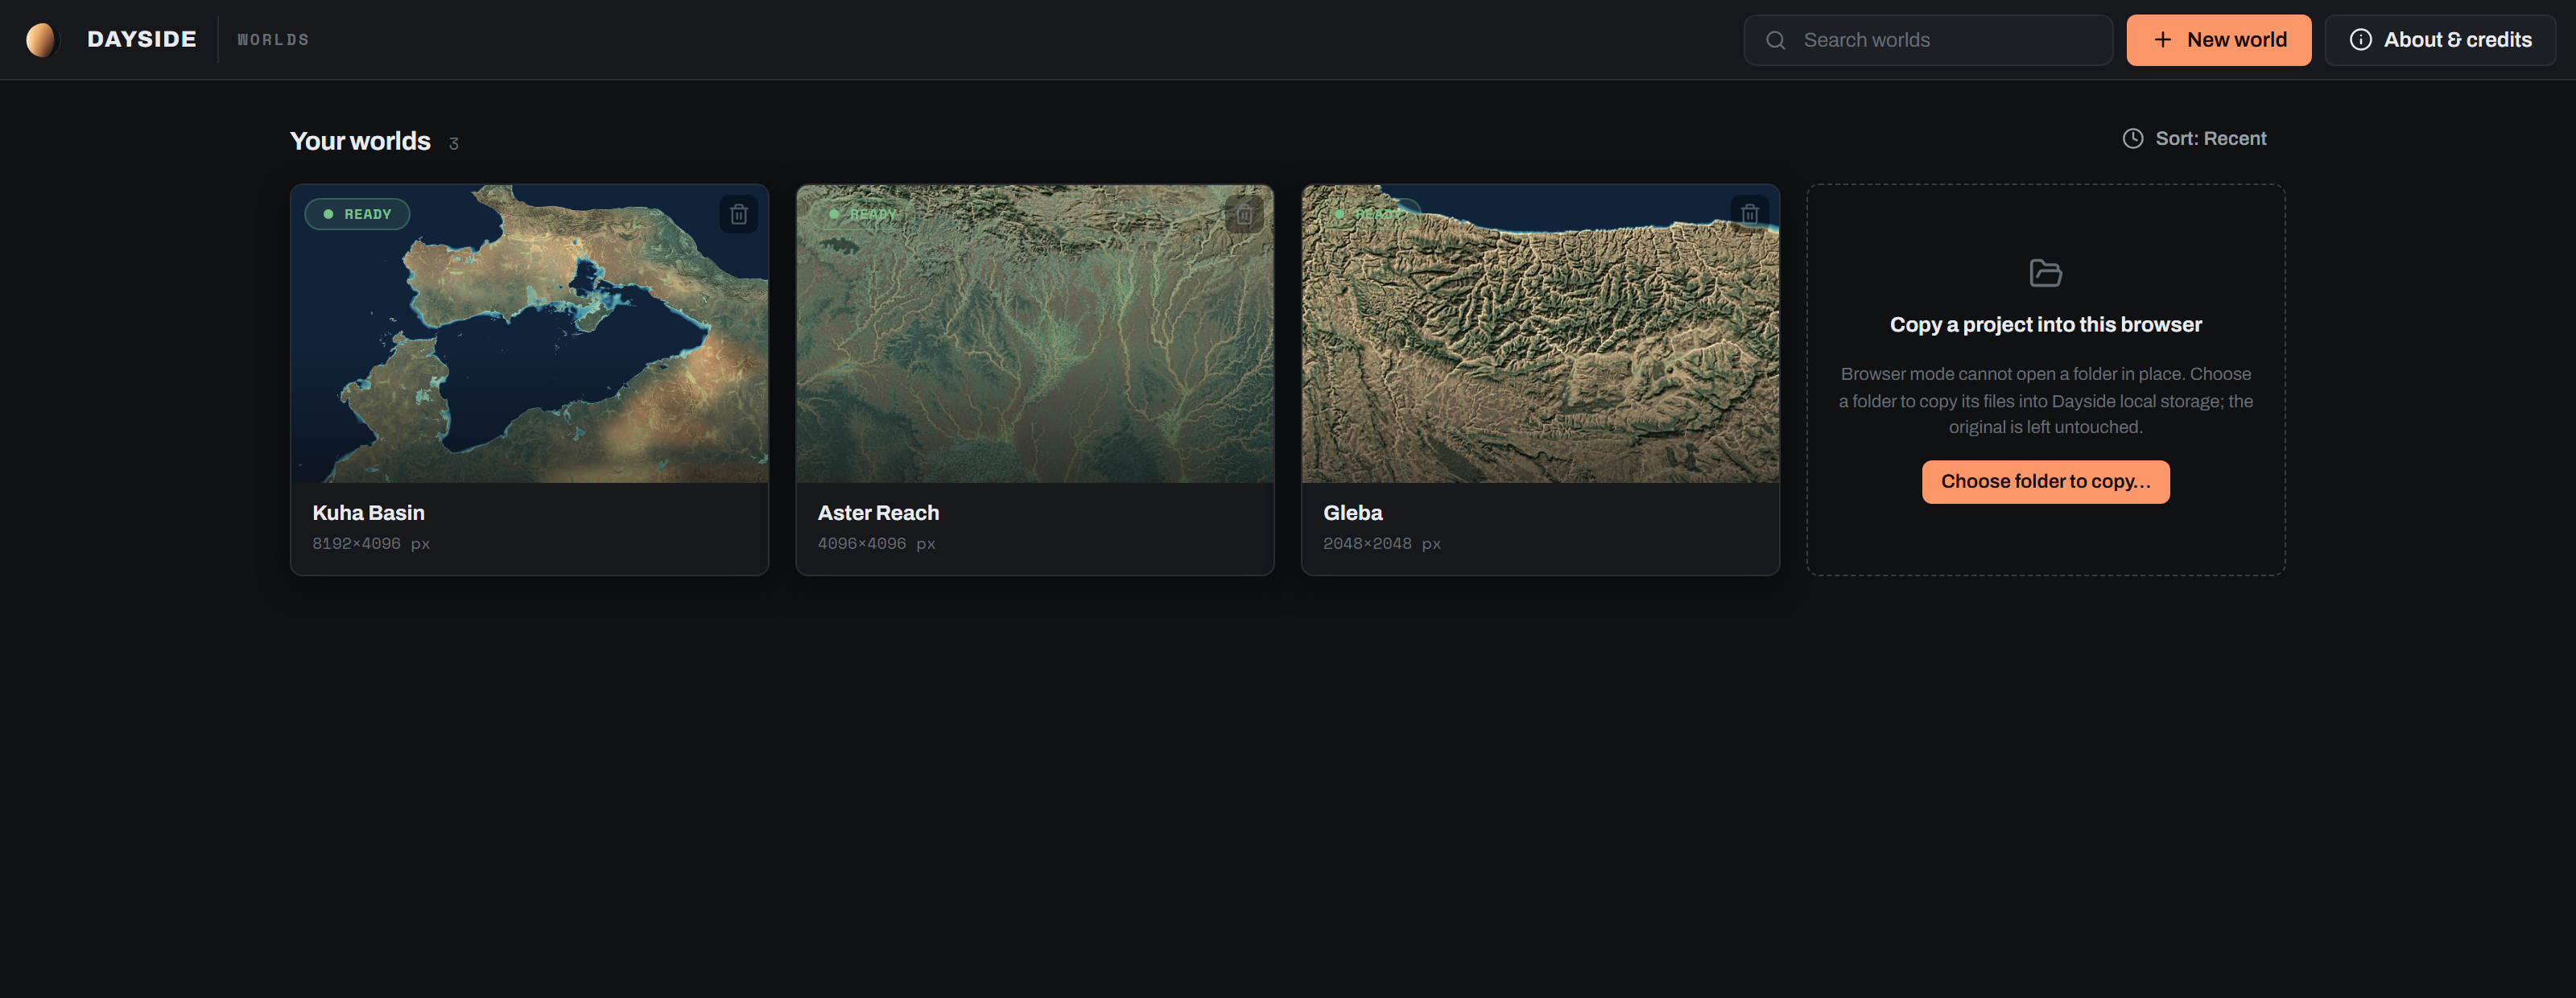
Each card carries a status badge:
| Badge | Meaning |
|---|---|
QUEUED | An acquisition is waiting in the render queue |
ACQUIRING · N% | A render is running |
READY | At least one section has a finished render |
NOT READY | Nothing has rendered yet |
Below the title you get opened <relative time> (once you have opened it at least once) and the world's pixel size.
If the engine is unreachable the grid is replaced by a takeover panel titled Can't reach the Dayside engine, with a Retry connection button. The picker also retries by itself every 5 seconds. On a fresh install with no worlds you get the NO WORLDS YET takeover instead, offering Import a world and New world.
Opening an existing world#
Click a card. A loading dialog runs the hydration and steps through its captions (Loading project, Restoring layers, Warming preview, Almost there), holds on screen for at least 2 seconds, then offers Open <name>. If hydration fails you get Could not warm this project and a Try again button. A world opens into the section editor if it is a flat map, or into the globe workspace if it is a whole world.
If the open itself fails afterwards, the picker shows a Couldn't open <name> dialog with Dismiss and Retry.
Opening a project folder in place#
The Open a project card takes an existing Dayside or project-r folder. It opens the Windows folder picker and then works in that folder: Dayside makes no private copy, and the status line afterwards reads Project opened in place. Dayside will save changes in that folder. Cancelling leaves everything alone (No folder selected. Your projects were not changed.).
Removing a world#
The trash icon on a card opens a two-stage confirmation.
Stage one is always safe: Remove from list takes the world out of your worlds list and leaves every file on disk. For a project you opened in place, this is the only stage offered, and the folder you chose is never touched.
Stage two is reachable only for a world Dayside created inside its own data folder, behind the Delete files from disk… link. Delete files permanently erases the world folder and everything in it, with no copy kept and nothing sent to the Recycle Bin.
Flat map or whole world#
This is the one choice in setup that changes the workflow. On the import path it is step 1, Shape; the blank starts pick it for you.
A flat map#
One rectangle, no reprojection, no globe. You land straight in the section editor and can paint and render immediately. A flat map records a map width in kilometres and a height derived from the image's pixel aspect. It has no planet radius, no regions, no globe tiles and no globe export.
The import core works inside a band of 10 km to 5,000 km per side, and it refuses rather than clamps: a width, or a height derived from the pixel aspect, outside that band stops the build with an out-of-range message naming the axis. Imports and synthetic worlds share one validator, so the band is the same for both. A 7,000 km continent has to come in as a whole world cut into sections, not as one flat map.
A whole world#
A planet you edit through focus areas. The image is treated as an equirectangular global map, and the project gains a planet radius, the globe workspace, region carving, per-tile editing and globe export. You draw a region on the sphere, Dayside cuts it out in an oblique Hammer projection so it is low-distortion, you edit it in the section editor, and the result folds back into the globe.
A whole world is the heavier path. It is worth choosing when you want a planet you can zoom into anywhere; a single continent or a single map sheet is faster and simpler as a flat map.
Choosing for a project that never said#
Projects imported from elsewhere (a project-r folder, for example) may carry no explicit workflow mode. Dayside infers one, and if the project could legitimately be either, opening it shows the fork dialog One map, or a whole world? before the editor: A flat map opens the editor, A whole world opens the globe workspace.
The switch is one-way in practice. Once a world has focus areas it refuses to become a flat map, and says so: keep it as a whole world, or delete its focus areas first. If the project changed in another window the dialog asks you to review and confirm again.
Where the terrain comes from#
The wizard opens on the start chooser, How do you want to start your world?, with three cards.
| Card | What it does | Shape |
|---|---|---|
| Import a heightmap | Reads a PNG or JPEG heightmap you already have and turns it into a world | Flat map or whole world, you choose |
| Start blank | Synthesizes a 2048 × 2048 flat canvas of uniform land with no sea, for you to sculpt | Flat map |
| Start a blank globe | Synthesizes a 4096 × 2048 equirectangular canvas whose waterline sits above the ground, so the planet starts as all ocean | Whole world |
Start blank fills its canvas at roughly 28 % of Height at white (about 1,100 m at the 4,000 m default) and puts the waterline at zero, so everything is land. You raise ranges and carve seas with the height brush. Start a blank globe puts the waterline above the fill instead, so you get an ocean planet with nothing on it and paint the continents on yourself. Neither generates terrain for you, and neither takes a seed.
Nothing in this version grows a planet from a seed. The tectonic generator exists in the code and its Planet step can still surface on a resumed draft, but its card is deliberately not offered.
The steps you get depend on the card:
| Start | Steps |
|---|---|
| Import a heightmap | 1 Shape, 2 Map, 3 Sea & terrain, 4 Build |
| Start blank | 1 Details, 2 Build |
| Start a blank globe | 1 Planet, 2 Build |
Above the steps sits a capability chip that probes this PC while you work: Checking this PC…, then either This PC can import, colour and export or Some components need attention. Check again re-runs the probe, and any repair action the server offers appears as its own button beside it.
Name and physical scale#
The Map step (or Details, or Planet) holds the name and the scale. The width field relabels itself according to the shape.
| Control | Engine key | Default | Range | What it does |
|---|---|---|---|---|
| Project name | name | My project | up to 120 characters | The world's display name. Editable at any point before you build. |
| Map width (km) (flat) | extent_km[0] | 200 km | 1 to 100,000 | Ground width of the map. The height comes from the image's pixel aspect. |
| Equatorial circumference (km) (world) | extent_km[0] | 40,000 km | 1 to 100,000 | Ground distance around the equator. The world's extent is recorded as circumference by half circumference, matching the 2:1 image. |
| Planet radius (km) (world only) | planet_radius_km | 6371 km | 1 to 100,000 | Used for the great-circle maths that carves regions off the sphere. |
| Height at white (m) | peak_m | 4000 m | 1 to 100,000 | The land elevation that pure white decodes to. Black decodes to sea floor or to sea level depending on where you put the waterline. |
Circumference and radius are recorded independently and are not cross-checked against each other. Ground resolution readouts (the scale chip, the scale bar) are derived from the circumference; the radius drives region geometry. Earth's numbers are 40,075 km and 6,371 km if you want them consistent.
Scale locks once the heightmap is read#
The scale fields are disabled the moment a draft exists, because the numbers are baked into the imported draft. Set them before you drop the file. The Sea & terrain step shows them read-only with an Edit map button back to the Map step, but the fields there stay locked. To change the scale after importing, use Restart setup.
Importing a heightmap#
Drop a file on the drop zone (Drop your heightmap here) or click it to open a file picker. The zone stays disabled until the scale fields are valid, so a file can never be read against an unset scale. While reading you see Reading heightmap…; afterwards you get the filename, a W × H · N-bit badge, a Replace <filename> button and the first 12 characters of the file's SHA-256.
File format and bit depth#
| Requirement | Value |
|---|---|
| Formats | PNG or JPEG, and the file's real format must match its type |
| File size | 256 MiB or less |
| Decoded pixels | 33,554,432 (32 megapixels) or less |
| Bit depth | 8-bit or 16-bit; reported back to you on the badge |
| Companion maps | Lossless PNG, exactly the same width and height as the heightmap |
Use a 16-bit greyscale PNG where you can. An 8-bit heightmap carries 256 elevation steps across the whole range, which at the default 4,000 m Height at white is about 15.7 m per step, and those steps show up as terracing once relief shading and slope-aware colour go over them. JPEG is 8-bit and lossy on top of that.
Colour images are accepted and collapsed to a single channel. The decode reads the raw values at full bit depth rather than converting to greyscale first, so a 16-bit map keeps its range.
Whole-world images must be 2:1#
A whole-world heightmap has to be exactly twice as wide as it is tall, because it is read as an equirectangular global map. Anything else is refused with A whole-world image must be twice as wide as tall. Flat maps take any aspect.
Replacing the file#
Replace <filename> re-imports at the current scale. A new heightmap invalidates every companion map, because those are validated against the heightmap's exact dimensions, so a climate map or rainfall map you already attached is cleared and has to go back on.
Changing the Shape choice also discards the imported draft, and the wizard warns you before it does.
Climate and biome source#
Under the heightmap sits the Climate and biome source picker. Climate drives the biome colour ramps, the snow model's precipitation, and the lake model's water balance, so it matters more than it looks.
| Option | What it does |
|---|---|
| Decide for me | Climate is derived from the heightmap's own geometry (latitude band and elevation) and classified into Köppen classes. No extra files. |
| Upload a climate map | A Köppen-coloured climate map at the heightmap's exact size. You then match its colours to classes. |
| Upload a biome mask | A second labelled uploader for an indexed mask you already prepared. |
| Pick from colours | Permanently disabled in this version, marked coming soon. |
Derived climate cannot place arid or Mediterranean zones, because those need a moisture model rather than temperature banding. Ground at or above 18 degC reads as tropical, which the engine treats as 2,000 mm/yr of rainfall. That is very wet for the snow and lake models, so if your world is meant to be dry, author a climate map.
Matching climate colours to Köppen classes#
Uploading a climate map opens a confirmation table, Match your climate colours to Köppen classes, listing every significant colour with its coverage percentage and a suggested Köppen class. Each row is a dropdown carrying all 31 classes plus Ignore (ocean / background). Colours the analyser thinks are ocean are pre-set to Ignore.
Use these biomes applies the mapping and recolours the map into the canonical Köppen palette. The button stays disabled if every row is set to Ignore. The detected ocean colour is remembered here, which is what makes Use my climate map's ocean available on the next step.
Rainfall#
The Rainfall picker appears on the import path once a draft exists, and it is optional.
| Option | What it does |
|---|---|
| No rainfall map | Rivers use uniform runoff, and terrain generation conditions on elevation alone. |
| Upload a rainfall map | A greyscale mean annual rainfall map, black driest and white wettest, at the heightmap's exact size. Lossless PNG only. |
A rainfall map does two jobs: it weights river catchments so a desert basin accumulates less flow than its geometry suggests, and it feeds the precipitation channel of terrain generation.
Rainfall at white#
Uploading opens a panel asking What rainfall does white mean? with one field, Rainfall at white (mm/year), valid from 1 to 100,000 in steps of 100. This number is the only record of what your map's brightness means in millimetres, and it is stored as the layer's max_mm_per_year decode.
Get it wrong and nothing visibly breaks. Terrain generation substitutes its own default of 3,000 mm/yr when a layer carries no recorded scale, so a 12,000 mm/yr map read at 3,000 conditions the model at a quarter of the intended scale and produces a plausible world with the wrong climate.
Editing the number re-analyses the same bytes (debounced, so typing a full figure is one request) and the statistics follow live: Resolved scale, Driest, Mean, Wettest, Fully dry, At white and Size. Two warnings can fire:
- uniform: the map is a single flat value with no variation, so it will not make rivers or terrain any more climate-aware than having no map at all. Usually a blank layer got exported instead of the rainfall channel.
- saturated: a large share of the map sits at pure white, so it was probably clipped and the real peak is higher than the number you entered. Raise the value or re-export without clipping.
Use this rainfall map at <n> mm/yr commits it. Afterwards the row reads Rainfall map attached, with the resolved scale, the pixel size, the file hash and a Remove rainfall map button.
Sea level and the ocean floor#
Step 3 on the import path. It opens with a read-only summary of Highest land, Map width or Circumference and Planet radius, plus an Edit map escape hatch.
The waterline#
Dayside proposes a waterline by running an Otsu split over the heightmap's brightness histogram, which lands in the valley between the ocean mode and the land mode. It reports the result as About N% is below the proposed waterline. and a N% ocean chip, with a preview image showing the sea in blue at the current setting. Two edge cases get their own wording: an essentially all-ocean map, and a map where no clear ocean was found (you can keep an all-land map).
| Control | Engine key | Default | Range | What it does |
|---|---|---|---|---|
| Waterline | sea_level_norm | The proposed split (0.5 if none can be found) | 0 to 1, step 0.005 | The brightness counted as sea level. Everything below it is ocean, everything above it is land, and the two branches meet exactly at the waterline. |
| Coastline softness | coastline_softness | 0.5 | 0 to 1, step 0.05 | Recorded alongside the section's coastline guide at publish time. |
coastline_guide record, but I found no engine code that reads it back. Confirm what it actually changes before this describes it as a control that does something.The waterline also sets the vertical scale of the ocean. Above it, brightness maps linearly to 0 m through Height at white. Below it, brightness maps linearly to the sea floor. Moving the waterline therefore re-derives the depth scale as well as the shoreline.
Reading the waterline from a mask#
A heightmap alone is an ambiguous land and sea reference, because a bright shallow shelf can out-read a genuinely low island. If you have a land mask or a climate map, it is ground truth and the waterline becomes whichever brightness best separates its land from its sea.
- Set sea level from a land mask takes a PNG at the heightmap's size. The brighter side is treated as land, and the two levels are split by Otsu, so a hard 0/1 mask and an off-black mask both resolve.
- Use my climate map's ocean appears only when you attached a climate map that had an ocean colour, and uses that class as the sea.
Deep-ocean floor#
The Ocean depth source radio group decides where the bathymetry comes from.
| Control | Engine key | Default | Range | What it does |
|---|---|---|---|---|
| No depth in my maps | bathymetry_source = none/v1 | selected | one of three | Nothing in your files describes depth, so Dayside can build a continental shelf, slope and abyssal plain for you. |
| My heightmap has depth | bathymetry_source = heightmap/v1 | not selected | one of three | The shades below the waterline are real depth, read as a continuation of the land ramp. |
| Separate depth map | bathymetry_source = uploaded-map/v1 | not selected | one of three | A bathymetry image with land in pure white and brighter meaning shallower. |
| Synthetic sea floor | synth_bathymetry | Auto | Auto, Always synthesize a sea floor, Off | Only shown for No depth in my maps. Auto carves a margin only when the existing ocean is essentially flat (peak-to-peak relief of 50 m or less), so a map with real bathymetry is left alone. |
| Deepest point override (m) | floor_depth_m | inferred from the waterline | 1 to 100,000 | Only shown for My heightmap has depth. The inferred value is peak x s / (1 - s) at the current waterline, and the panel prints it. |
| Deepest point (m) | floor_depth_m | 6000 m | 1 to 100,000 | Only shown for Separate depth map. What pure black in the depth map decodes to. |
A synthesized margin is built at a shelf 130 m deep and 60 km wide, an 85 km slope, and an abyssal floor at 6,000 m. (The bathymetry function's own fallback is a 40 km slope, but every request the app sends carries the 85 km default, so 85 km is what you get.)
Synthesizing matters more than it sounds. A map with no depth reads to the terrain model as flat land at the coast, and the model invents coastal relief to explain it. A real shelf anchors the shoreline in the conditioning itself.
An uploaded depth map is analysed on the way in and reports N% land (pure white) · proposed waterline N%, with a Use this map's sea level button if you want its waterline instead of the heightmap's. Attach depth map commits it. Land and sea still follow the waterline above; the depth map only supplies ocean depth. The Keep it button stays disabled while Separate depth map is selected with nothing attached.
The synthetic setting is ignored whenever a depth source declares authored depth, so Auto on the heightmap-has-depth path is not a fallback that can fire behind your back.
Building the world#
The last step reviews what you chose:
| Row | What it shows |
|---|---|
| Shape | Whole world or Flat map |
| Starting terrain | Import <filename>, Blank flat world, or Blank globe (ocean planet) |
| Physical scale | Width, or circumference and radius |
| Additional layers | Where biomes came from, and the rainfall source with its mm/yr at white |
| Destination | Always Dayside local library |
The primary button names what it will do: Create & render for an import, Create blank world, Create blank globe. While it runs the pane shows a progress caption (Creating your world…, or the creation state), and on success <name> is ready followed by Opening the editor…. Dayside navigates you into the world by itself, straight to the globe workspace for a whole world and to the section editor for a flat map.
Save, resume and restart#
Creation runs as a durable operation on the server, which is what makes the wizard safe to leave.
- Cancel creation stops the run and preserves the work as a resumable operation. It is offered while a creation is in flight.
- Resume creation re-dispatches that preserved operation. It appears once a cancelled creation is resumable.
- Save and close leaves the wizard, detaching a running creation first so it can be resumed later. It is blocked during tectonic planet generation, which has no resume contract.
- Restart setup clears everything and returns to the start chooser. It asks first (
Restart setup?) and it discards any imported heightmap draft. - The header close button is disabled while a creation is active, and routes through the same save-and-close path otherwise. Escape does the same thing as the close button, and closes the restart dialog first if that is open.
Reopening #/setup returns you to the step the draft had reached: the drop step when no draft exists, Sea & terrain when one does, and Build once creation has started. Short paths clamp to their own last step.
Import drafts are retained for 30 days and then expire.
Where you land#
A flat map opens the section editor#
The world becomes one section you paint, render and export directly. The footer reads EXTENT <w> × <h> km from the recorded scale. Terrain authoring, rendering and export are covered in Painting terrain.
A whole world opens the globe workspace#
You get a rotatable sphere, a Flat view, and a side panel of Regions and Globe tiles. Nothing is carved yet.
To make a region, pick the Box or Lasso tool, drag a selection on the globe, then name it in the composer that appears. Under Advanced controls the composer offers Output long side (default 2048 px; the field accepts 32 to 16384, but the server refuses anything above 8192) and an Overlap policy of Allow overlap or Reject overlap. Regions are cut with a 32 px feathered margin, which is why a region's stated size is the selection you drew rather than the padded raster on disk.
Every region and tile you edit marks the globe out of date, and the status chip switches from Globe up to date to Globe out of date. Re-compose globe folds your edits back in. Export globe ships the result, and stays disabled until a globe exists to ship.
The world rebuild panel#
The rebuild panel is the older mosaic builder: it takes your ready focus areas and publishes them as one world output. Its controls are a checkbox list of Focus areas, a checkbox list of World layers, an Output size from 512 × 256 up to 16384 × 8192, Blend edges in pixels (0 to 4096), Match section brightness, Fill uncovered ocean from base world, and an Uncovered land policy of Keep base world, Leave empty or Stop on gaps. It publishes into the same active mosaic slot the globe colour pass uses, keeps the previous output available until publishing completes, and offers Restore previous afterwards.
The globe workspace supersedes it. Re-compose globe is the everyday equivalent, and it is non-destructive: it folds edited tiles in rather than rebuilding everything.
WorldRebuildPanel is fully implemented and tested but is not mounted anywhere in the shipped UI, so there is no navigation that reaches it. Its Rebuild globe job still appears in the Job Dock. Confirm with engineering whether this section should describe a screen users can open, or be cut.